


OBS Virtual Camera is a built-in feature of OBS Studio that turns what OBS is showing into a camera device. Zoom, Microsoft Teams, Google Meet, Discord, and other apps can then select OBS Virtual Camera from their camera menu and receive your OBS scene as if it came from a webcam.
It is free, included with OBS Studio 26.0 and later on Windows and 26.1 and later on macOS, and does not require a separate plugin. On Linux it relies on the v4l2loopback kernel module.
How to start OBS Virtual Camera
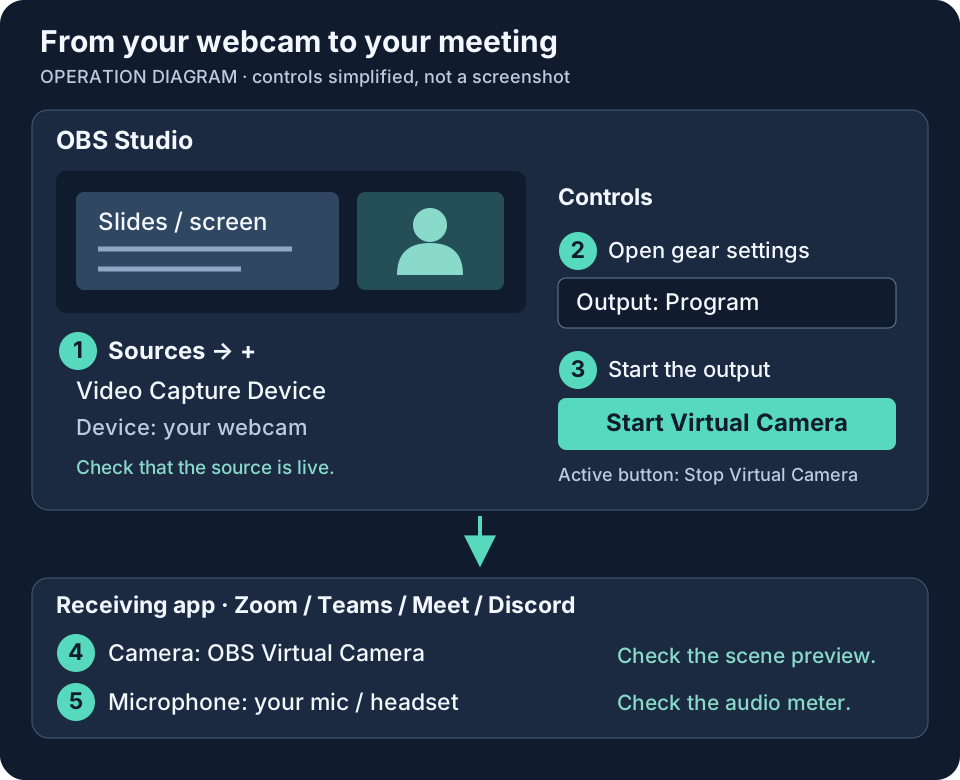
- Add your camera. In OBS, choose Sources → + → Video Capture Device, create a source, and select your physical webcam under Device. Confirm you see a live picture. Add a screen or slides if the call needs them.
- Choose the output. Click the gear beside Start Virtual Camera in the Controls dock. Start with Program to send the finished OBS output. The table below explains the other choices.
- Start the camera. Click Start Virtual Camera. The button changes to Stop Virtual Camera. You do not need to start streaming or recording.
- Select it in the receiving app. Open the app’s camera settings and choose OBS Virtual Camera, rather than your physical webcam. Check that its preview shows the intended OBS layout.
- Select your microphone separately. Choose your microphone or headset in the receiving app’s audio settings, then check its input meter. OBS Virtual Camera carries video only.
Keep OBS open for the call. Click Stop Virtual Camera when finished. If the device is missing, fully quit and reopen the receiving app after starting the virtual camera.
Jump to the setup for Zoom, Microsoft Teams, Google Meet, or Discord. If something fails, start with the troubleshooting table.
Choose Program, Preview, Scene, or Source
The gear beside the virtual-camera button opens its output settings. These options choose which OBS picture the other app receives; they do not select the webcam that feeds OBS.
| Output | What the other app sees | When to choose it |
|---|---|---|
| Program | The finished program output, following your live scene changes | A presentation or call that should follow the OBS program |
| Preview | The preview side while using Studio Mode | Only when you deliberately want to show work in progress; viewers can see your edits |
| Scene | One selected scene, even while you work on other scenes | A fixed meeting layout that should stay on screen |
| Source | One selected source | Just the camera or another individual source, without the rest of the scene |
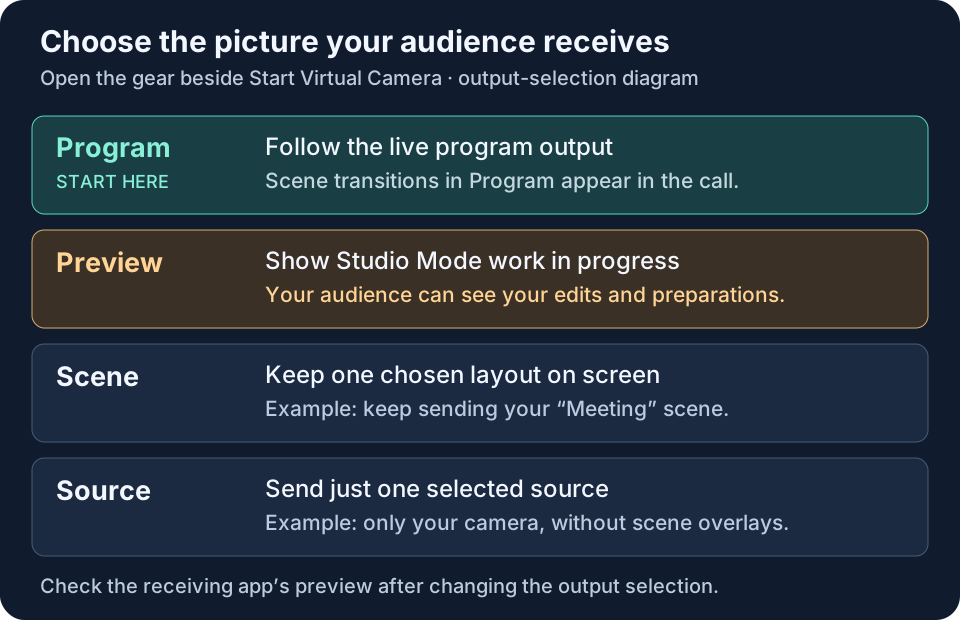
For example, choose Scene → Meeting if the audience should keep seeing that layout while you prepare a different scene. Selecting Preview instead can expose those preparations. The official OBS guide documents all four output modes.
Extra step on macOS
On macOS 13 and later, OBS Studio 30.0 and later installs the virtual camera as a system camera extension. If macOS asks for approval, open System Settings → Privacy & Security → Security on macOS 13 or 14, or System Settings → General → Login Items & Extensions → Camera Extensions on macOS 15 and later, and allow OBS. Restart OBS, start the virtual camera, then restart the app that should use it. On Linux, install v4l2loopback before starting the virtual camera.
For installation and macOS compatibility details, follow the OBS troubleshooting documentation.
Use OBS Virtual Camera in Zoom, Teams, Meet, and Discord
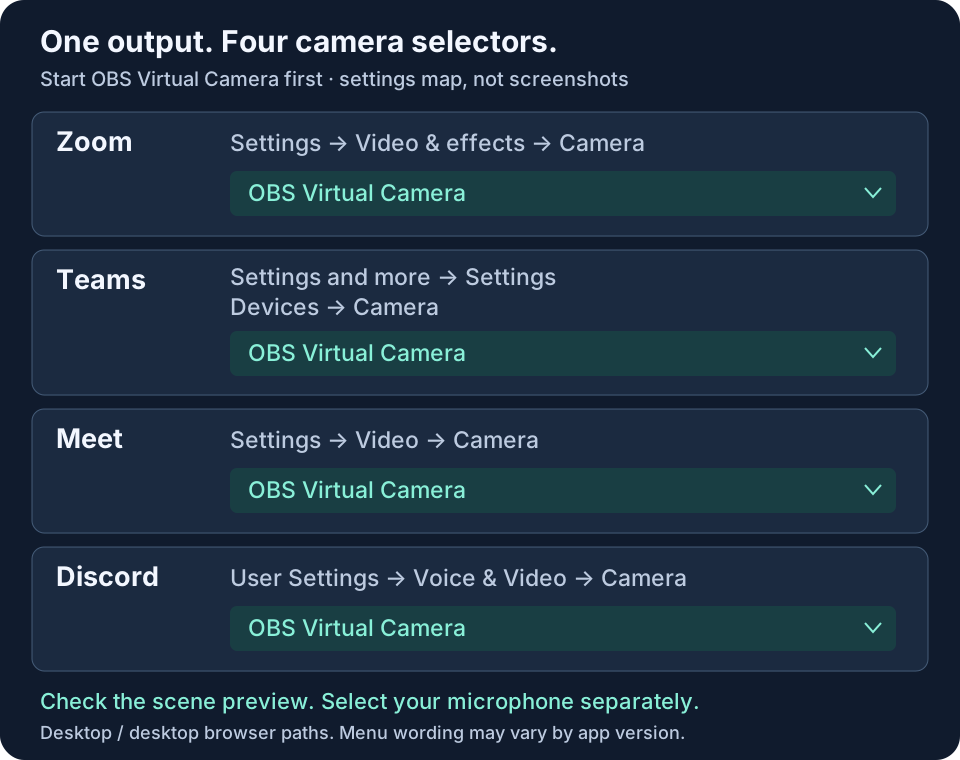
Start the virtual camera in OBS before opening the destination’s camera selector. These are desktop and desktop-browser instructions; menu labels can vary by app version. Seeing your physical webcam alone is not a successful test if your intended OBS layout includes slides or an overlay.
Zoom
- Open the Zoom desktop app’s Settings → Video & effects (called Video in some versions).
- Under Camera, choose OBS Virtual Camera. During a meeting, the arrow beside the video button also opens the camera selection or video settings.
- Check that the preview contains your OBS scene. Under Audio, select and test your microphone or headset.
If OBS is missing, fully quit Zoom, start the virtual camera in OBS, then reopen Zoom. If the device is listed but shows an OBS logo, check that OBS says Stop Virtual Camera. See Zoom’s settings documentation for its current camera and audio controls. For camera contention, see using one webcam in Zoom and OBS.
Microsoft Teams
- In Teams on desktop, open Settings and more → Settings → Devices.
- Find the video settings and choose OBS Virtual Camera under Camera. Check the preview before joining.
- Choose your microphone under the audio settings. In a meeting, the arrow beside Camera opens video settings where you can change the camera.
If the device is missing, fully quit Teams, including its system-tray process on Windows, and reopen it after starting OBS Virtual Camera. Check camera permission for Teams; for Teams in a browser, also check that site’s permission. Availability can depend on your app version and organization settings. Microsoft’s device-settings guide describes the controls.
Google Meet
- In a desktop browser, open your Meet call or its pre-join screen, then More options → Settings → Video.
- Choose OBS Virtual Camera under Camera. Allow camera access if prompted.
- Check the preview, then open Audio and select your microphone. Return to the call and turn on your camera when ready.
If the device is missing, check camera permission for meet.google.com, reload the tab, and reopen the selector. If needed, fully restart the browser after starting OBS Virtual Camera. Follow Google’s video and audio settings guide for the current controls.
Discord
- Open User Settings with the gear near your account controls, then choose Voice & Video.
- Under the video settings, select OBS Virtual Camera from Camera and click Test Video.
- Confirm the OBS picture appears. Select your microphone under Input Device, then join a call or voice channel and turn on your camera.
If OBS is missing, fully quit Discord and reopen it after starting the virtual camera. In the browser version, allow camera access for Discord as well. A settings preview alone does not broadcast video to a channel; use the call’s camera button. Discord’s video-call guide explains selection, preview, and joining a video call.
What does OBS Virtual Camera do?
A normal webcam sends one camera image. OBS Virtual Camera sends a selected OBS output, so a meeting app can receive your camera beside slides, titles, overlays, a screen share, or several sources in one layout.
Webcam + screen + images + text → OBS scene → OBS Virtual Camera → Zoom, Teams, Meet, or Discord
The receiver sees a camera named OBS Virtual Camera. Choose Program for the live composition, or select a particular Scene or Source when you only want that content sent to the call.
What OBS Virtual Camera does not do
- It does not send audio. The receiving app still uses its own microphone setting. Sending OBS audio into a call requires a separate virtual audio device.
- It does not stream or record. OBS streams and records directly. The virtual camera is only for apps that accept a camera input.
- It does not add face-aware beauty effects. OBS can crop, color-correct, mask, and key sources, but it does not adjust skin, facial lighting, makeup, or face shape.
- It does not work while OBS is closed. The receiving app shows a black or placeholder image when OBS is not running or the virtual camera is stopped.
What resolution does OBS Virtual Camera use?
The virtual camera uses the Output (Scaled) Resolution and frame rate from Settings → Video in OBS. For video calls, 1280×720 or 1920×1080 at 30 fps is usually enough. Higher values add load to OBS without improving what most meeting apps transmit.
Most meeting apps also limit the resolution they send, so a 1080p virtual camera can still look softer to other participants than in your OBS preview.
When should you use OBS Virtual Camera?
Use it when the other app needs an OBS scene, not just your face. Good examples include:
- Teaching or presenting with slides and a camera in one layout
- Running a webinar with branding, titles, or a countdown
- Sending a multi-camera or picture-in-picture layout into a meeting
- Reusing a streaming layout during a video call
If you only want a better-looking webcam in Zoom or Teams, you do not need OBS in the path. Dedicated virtual camera software such as CiCi Cam processes the webcam and is selected directly in the meeting app. The OBS Virtual Camera vs virtual camera software guide compares both workflows and explains how to combine them.
Common OBS Virtual Camera problems
First identify where the problem appears. A missing button inside OBS, a missing device in Zoom, and a listed camera with no picture need different checks. For step-by-step fixes by app (Zoom, Teams, Discord, browsers) and by operating system, see OBS Virtual Camera not working.
| Symptom | Check first | Next step |
|---|---|---|
| No Start Virtual Camera button in OBS | Is the Controls dock visible? | Restore the dock, then check installation |
| No OBS device in the receiving app | Camera permission and the app’s device list | Restart the receiver and check registration |
| Device is listed but shows an OBS logo | Is OBS running and sending video? | Start the output and reselect it |
| Black picture | Does the selected OBS output contain a visible source? | Trace the picture back to its source |
| Wrong or unchanging scene | Program versus a fixed Scene or Source | Check the output selection |
| Video works but there is no sound | Microphone selected in the receiving app | Set up audio separately |
| Camera missing on Mac | OBS version and camera-extension approval | Check Mac compatibility and permissions |
Start Virtual Camera button is missing
If the whole Controls panel is missing, enable Docks → Controls. If that panel is visible but the button is absent, check the virtual-camera installation rather than repeatedly restarting the meeting app.
On Windows, the official OBS repair instructions point to C:\Program Files\obs-studio\data\obs-plugins\win-dshow: right-click virtualcam-install.bat and choose Run as administrator. Use the equivalent folder inside your OBS installation if you installed elsewhere. Run the file supplied by your OBS installation, then reopen OBS and the receiving app. For macOS, follow the extension steps below; on Linux, check that v4l2loopback is installed using the official distribution-specific instructions.
OBS Virtual Camera does not appear in the camera list
- Start the virtual camera in OBS, then fully quit and reopen the receiving app. Closing its window may leave it running in the system tray.
- Check OS camera access for that app. On Windows 11, look under Settings → Privacy & security → Camera, including desktop-app access; on Windows 10, use Settings → Privacy → Camera.
- For a browser call, also allow the meeting website to use the camera, then reload it and reselect the device.
- If the device remains missing in multiple compatible receivers, check OBS installation or camera-extension approval. If it works in one receiver, focus on the other app’s permissions, version, and device policy first.
The general virtual-camera discovery guide covers permissions and receiver restarts. Installing the old third-party OBS-VirtualCam plugin is not required for current OBS Studio.
The camera shows an OBS logo or placeholder
The device may still be selectable while OBS is closed or its virtual-camera output is stopped. Open OBS and click Start Virtual Camera; while active, the control reads Stop Virtual Camera. Reselect the device or reopen the receiving app if its preview does not refresh. If the output is active but black, continue with the source checks below.
The camera shows a black screen
Check the selected output in the virtual-camera gear menu. If you chose Scene or Source, inspect that particular item, not only the scene visible in the main OBS window. Make sure it contains a visible, enabled source; temporarily choose Program and a simple scene to narrow down the issue.
If the camera is black inside OBS too, open its Video Capture Device → Properties and confirm the physical webcam or intended processed camera is selected. Close competing apps using that physical webcam, check OBS camera permission, and verify the source’s visibility icon. If OBS has a live picture but the receiver is black, stop and restart virtual-camera output, then reopen the receiver.
The wrong scene appears or scene switches do not show
Open the virtual-camera gear menu. Scene stays on the scene you chose, and Source stays on its selected source. Choose Program if the receiver should follow live scene changes. In Studio Mode, editing the preview does not change Program until you transition it. Choose Preview only if the audience is meant to see those edits.
There is video but no sound
Choose your microphone or headset in the receiving app and check mute controls and its input meter. OBS Virtual Camera does not include the OBS audio mix. If you need music, media, or mixed OBS audio in the call, that requires a separate audio route. The audio-routing steps in the official OBS video-call guide explain virtual audio devices and monitoring; that guide’s later projector and screen-sharing steps describe a different video route. Check that call playback is not being fed back into the microphone route.
OBS Virtual Camera is missing on Mac
Camera access and camera-extension approval are separate settings. For OBS 30 or newer on macOS 13 or newer, allow the OBS extension under Privacy & Security → Security on macOS 13/14, or General → Login Items & Extensions → Camera Extensions on macOS 15 and later. Restart OBS, start its virtual camera, then restart the receiver.
Also check Privacy & Security → Camera for OBS when capturing a physical webcam and for the receiving app or browser. OBS’s official documentation states that its older virtual-camera component in OBS 29.1 and earlier does not work on macOS 14; update OBS to a compatible version. For older macOS installations, use the official compatibility notes for that OS rather than applying the newer extension procedure.
The image looks mirrored
Many meeting apps mirror your self-view only. Other participants see text and logos the right way round. Turn off the app’s mirror option if the self-view is distracting.
The webcam inside OBS is black or “in use”
Another app is holding the physical webcam. In the meeting app, select OBS Virtual Camera, not the physical webcam, so that only OBS opens the real camera.
Frequently asked questions
Is OBS Virtual Camera free?
Yes. It is part of OBS Studio, which is free and open source. No separate download is needed in OBS 26.0 and later on Windows or 26.1 and later on macOS.
Is OBS Virtual Camera safe?
It is maintained by the OBS Project and installed with OBS Studio. It only sends the video you build in OBS, and only while the virtual camera is running.
Does OBS Virtual Camera work with Zoom, Teams, and Google Meet?
Yes. It appears as a standard camera in Zoom, Microsoft Teams, Google Meet in Chrome or Edge, Discord, and most other apps with a camera menu. Some browsers and work devices may require camera permissions or administrator approval.
Does OBS need to stay open?
Yes. OBS produces the video, so closing OBS or clicking Stop Virtual Camera ends the feed.
Can I add a beauty filter to OBS Virtual Camera?
OBS has no built-in face-aware beauty filter. You can process the webcam in CiCi Cam first, add CiCi Cam to OBS as a Video Capture Device, and then send the finished scene through OBS Virtual Camera. On Windows, CiCi OBS Plugin can instead apply beauty directly to a camera source inside OBS.
Summary
OBS Virtual Camera turns your OBS scene into a webcam that other apps can select. Use it when a meeting or call needs your full OBS layout. Use dedicated virtual camera software when you only need an enhanced webcam, and connect both when you need enhancement and scene composition together. For a broader explanation of camera devices, see what a virtual camera is.
Sources and review scope
Setup paths and troubleshooting were reviewed against the linked OBS, Zoom, Microsoft, Google, and Discord documentation on October 29, 2026. The SVGs are explanatory diagrams, not screenshots. Confirm the outgoing picture and microphone in your own app before a call.